The miniSMU MS01 can be connected to your computer using either USB or WiFi. This section explains how to establish these connections to begin controlling your device.
Connectivity Options Overview
| Connection Type | Advantages | Limitations | Best For |
|---|---|---|---|
| USB | Simple setup, reliable connection, no network configuration | Requires physical proximity, cable management | Laboratory settings, initial setup |
| WiFi | Wireless flexibility, remote operation, multiple device access | Requires network configuration, potentially less stable depending on network conditions | Remote measurements, shared facilities, field work |
USB Connection
The USB connection provides a direct, reliable link between your computer and the miniSMU MS01.
USB Connection Prerequisites
- miniSMU MS01 powered on (via USB-C or 12V DC adapter)
- Available USB port on your computer
- Supplied USB-C cable or equivalent high-quality cable
USB Connection Procedure
Ensure the device is powered on
- The power switch should be in the ON position
- The status LED should be illuminated on the rear panel
Connect the USB-C cable to the miniSMU MS01
- Locate the USB-C port on the rear of the device
- Gently insert the USB-C connector into the port
Connect the other end to your computer
- Insert the USB-A end of the cable into an available USB port on your computer
- Use a USB 3.0 port (typically blue) if available for better power supplying capability
Wait for device recognition
- Your computer should automatically recognise the device
- Driver installation should occur automatically
Verify connection
- On Windows, you can check Device Manager to confirm the device appears as a COM port
USB Connection Troubleshooting
If your computer doesn't recognise the miniSMU MS01:
- Try a different USB port on your computer
- Try a different USB cable
- Restart your computer and the miniSMU MS01
- Check Device Manager for any devices with warning symbols
WiFi Setup
WiFi connectivity allows for wireless operation of your miniSMU MS01, offering flexibility for remote measurements and shared access.
WiFi Setup Prerequisites
- miniSMU MS01 powered on and connected to a PC using a USB-C cable
- miniSMU software installed on your computer
- Access to a 2.4 GHz WiFi network
- WiFi network name (SSID) and password
WiFi Connection Procedure
Attach the WiFi antenna
- Locate the SMA connector on the rear panel
- Gently screw the provided WiFi antenna onto the connector
- Hand-tighten only - do not use tools
Connect via USB first
- Follow the USB connection procedure above
- Launch the miniSMU desktop application
- Connect to the miniSMU's serial port in the software
Access WiFi settings
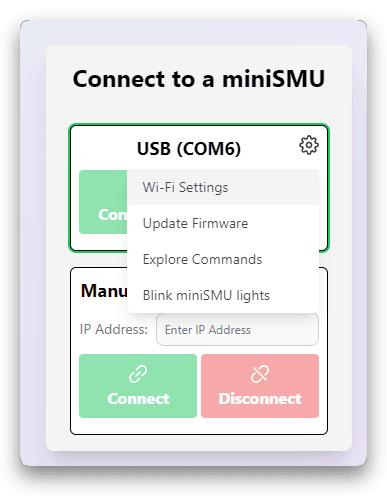
- Click the gear icon in the desktop application connection window
- Click "Wi-Fi Settings" in the menu that appears
Enable WiFi radio
- Click "Enable" under the "Wi-Fi Radio" section
- Wait for the WiFi status LED to begin flashing
Scan for available networks
- Click "Scan Wi-Fi Networks" button
- Wait for the scan to complete and display available networks
Select your network and enter credentials
- Select your WiFi network from the list
- Enter the network's password in the provided field
- Click "Connect" to attempt connection
Configure auto-connect (optional)
- Upon successful connection, the option to automatically connect to this WiFi network upon miniSMU startup can be toggled
- Enable this option if you want the device to connect to this network every time it powers on
Disconnect USB and verify WiFi connection
- After successful WiFi setup, you can disconnect the USB cable
- In the miniSMU software, automatically detected network miniSMUs will appear for connection.
- Under some network conditions, network auto-discovery may not function. Instead, note the miniSMU's IP address from the Wi-Fi Settings page and copy it into the "Manual network connection" box to connect.
WiFi Connection Notes
- The miniSMU MS01 supports 2.4 GHz networks only (WiFi 4 / 802.11b/g/n)
- For optimal performance, position the device within good range of your WiFi router
- The device uses mDNS for network discovery - ensure UDP port 5353 is not blocked
- The miniSMU communicates over TCP port 3333 - ensure this port is available on your network
WiFi Troubleshooting
If you encounter issues with WiFi connectivity:
- Ensure the WiFi antenna is properly attached
- Verify your network operates on the 2.4 GHz band (not 5 GHz only)
- Check that your WiFi signal strength is adequate where the miniSMU is located
- Restart your WiFi router if necessary
- If the WiFi LED is red, it indicates a failed connection - try resetting WiFi settings
Switching Between Connection Methods
You can switch between USB and WiFi connections at any time:
- The miniSMU software can discover devices on both USB and WiFi simultaneously
- You can manually select which connection to use in the device selection dialog
- WiFi connectivity will persist through power cycles if auto-connect is enabled
Multiple Device Connectivity
If you have multiple miniSMU devices:
- All devices will appear in the discovery list in the software
- Each device has a unique identifier (shown in the software)
- You can connect to multiple devices simultaneously by launching multiple instances of the miniSMU Application
Next Steps
Once you've successfully connected your miniSMU MS01 to your computer:
- Proceed to Software Installation to set up the control software
- After software installation, you'll be ready to begin basic operations with your device
By establishing a reliable connection between your computer and the miniSMU MS01, you've completed an essential step toward using your device for precision measurements and characterization.